
When I went to school for machining, I worked on a bunch of different projects that taught me the basics of the trade. From keychains to hammers, I did all the typical stuff.
One thing that I found out after the program, though, is that the chess pieces and keychains were quickly lost, but the tools I made are still in my box and used daily 12 years later. When you’re able to use great tools that you made yourself, it adds a definite element of pride to your work.
I’ve compiled a list of practical projects for up-and-coming machinists to hone their skills. They’re not decorative pieces, like turner’s cubes or random widgets. All of them are tools that you’ll likely use every week, if not every day.
For each one, I’ll go over the BOM, the equipment needed, and give you the drawings. Most of them are ones that I’ve made myself, and some of them are the upgraded versions to make them more useful as tools.
Table of Contents
Slide Hammer
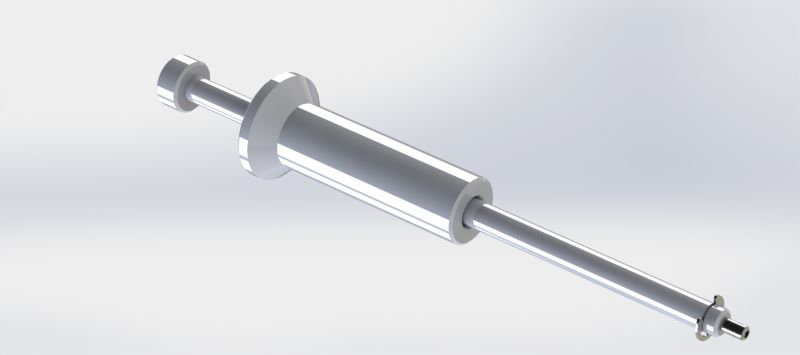
If you’re working with pull dowels, which are a common fixturing element in many shops, then you’ll need one of these in your toolbox.
This is a nice and simple project that is great for absolute beginners. It doesn’t take too long to do, but it will give an opportunity to learn the fundamentals of turning.
This tool is exactly what you’ll need to pull 1/2 dowels from tight holes. To make it last longer, there’s a replaceable 1/4-20 set screw that’s used to hold on to the dowel. Mine’s in perfect shape still, aside from a few scuffs and dings, and I use it daily.
Personally, I like making tools out of stainless where possible, since they’ll last longer than I will. If the budget is tight or selection is limited, though, you can just as easily use steel or aluminum.
Here’s the BOM:
- Ø 2.0″ x 4-5/8″ long stainless (1 pc)
- Ø 0.50″ x 12-1/8″ long stainless (1 pc)
- Ø 1.0″ x 5/8″ long stainless (1 pc)
- 1/2″ E-clip (1 pc)
- 1/2-13 x 1″ long socket head set screw (1 pc)
And here are the drawings:
Machinist’s Hammer
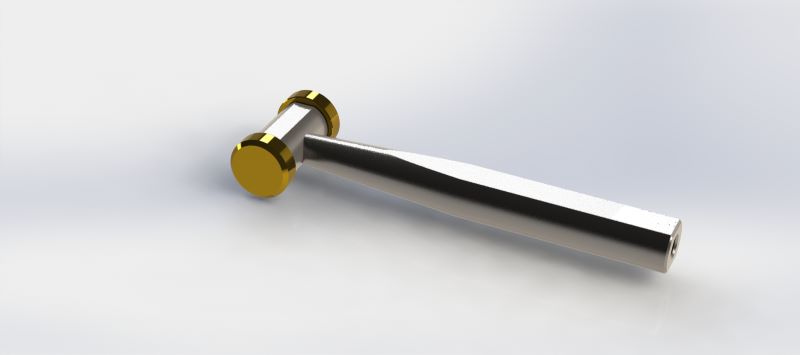
I don’t know a single machinist that hasn’t made one of these.
The actual design varies by school, but they all look essentially the same.
I modified the design of the one I made over a decade ago based on things I wasn’t crazy about. For example, this one has flats on the handle. I always found it annoying that with a fully round handle, you couldn’t keep the hammer straight by feel – you had to look at it. Now that’s fixed.
To mill the flats, I wait until the hammer is finished and assembled. Then I stick it in a milling vise, dial in the hammer head, and mill one side and add the chamfer. Then I flip it, using the underside as a register for the second flat and chamfer.
I also drilled a hole in the bottom of the handle. I use it to fit allen keys, so I can use the hammer as a small cheater bar. It’s saved my knuckles a few times. You can make it shallower or deeper to get a hammer balance that suits you.
I adjusted the balance between the head and the handle to something I find more comfortable for the light tapping that this type of hammer is more typically used for. Some people like to have one end brass and one end aluminum, although I prefer two brass inserts – that’s the end I always use anyway. And, since brass is significantly heavier than aluminum, I find that it feels better.
This is a good project to get familiar with taper cutting on the lathe. For cutting the self-holding tapers for the inserts, I usually lock the compound rest at the angle and use a single setup to cut both the male and female tapers. If you get a smooth surface, that taper will hold forever. Either the taper attachment or the offset tailstock method can be used for the handle.
Here’s the BOM:
- Ø 1.25″ x 10.125″ long steel (1 pc)
- Ø 1.25″ x 2.125″ long steel (1 pc)
- Ø 1.50″ x 1.25″ long steel (2 pcs)
Here are the drawings:
Toolmaker’s Vise
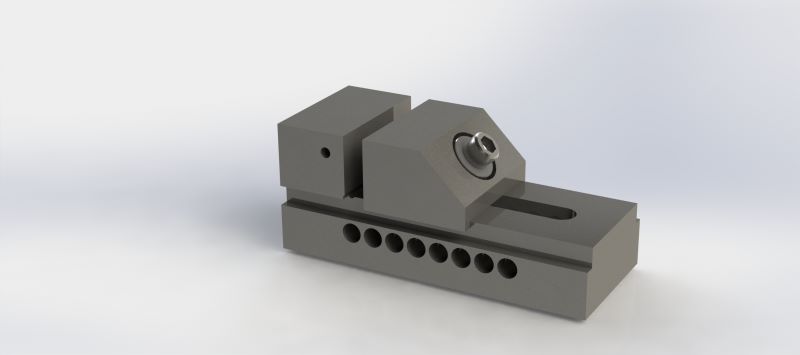
This one is good for more advanced students. Traditionally, this has been a project for tool and die makers. The skills that are targeted are job planning with grind allowance and order of operations. Machines used are mills, heat treating ovens, grinders, and lathes.
The vise is definitely an involved project, but one that’s well made is a work of art. For an extra challenge, try CNC engraving the name of the student in the vise body prior to heat treat and try to make the letters appear even after grinding.
I strongly prefer to make this out of A2, since it’s stable and air-quenched, which means that the vise will be nice and clean. Some schools choose to use 4140, but it can be pretty demotivating when a student rough machines the part, and then has to do it again because it cracked in the oil quench.
Here’s the BOM:
- 2.5″ x 2.5″ x 6.125″ A2 tool steel (1 pc)
- 2.5″ x 2.5″ x 1.4375″ A2 tool steel (1 pc)
- Ø 1″.0 x 1.0625″ long 4140 HTSR (1 pc)
- 3/8-16 x 2.25 SHCS (1 pc)
- CL-2-SW Spherical Washer (1 pc)
I went light on this drawing. Lots of schools have it slathered with GD&T. Personally, I love it, since it helps ensure a working part at the end of the day. If you want to add the GD&T requirements on this drawing, you’ll usually find this part covered in perpendicularity and parallelism callouts of 0.0003″everywhere. Use your discretion with what your students can reasonably measure.
Micrometer Stand
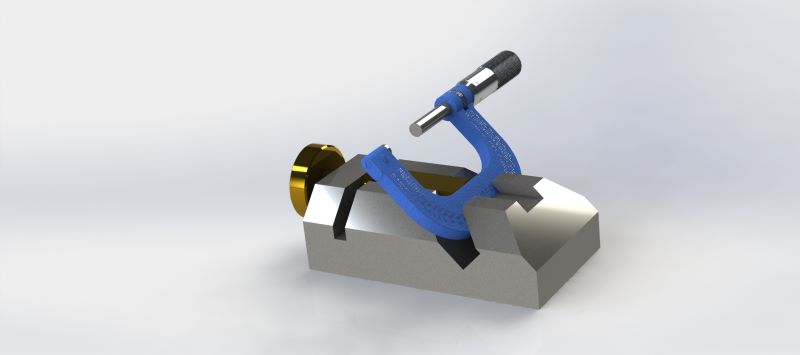
This one is actually really uncommon to see as a school project, but it’s definitely a handy tool to have. Whether you’re checking against the standard or trying to measure an awkward little part to 0.0002″, a mic stand is worth having around.
What I like about this project is that it’s actually pretty forgiving, but it looks really nice if you can get good surface finish. Plus I always like how the combination of brass and steel look.
Overall this project will help the beginner learn basic things like slotting on a mill and threading on a lathe. There are lots of non-critical features that are purely cosmetic, but there are a handful that just need to be done right for this thing to work smoothly.
Here’s the BOM:
- 1.5″ x 2.5″ x 4.625″ steel (1 pc)
- 0.75″ x 0.75″ x 2.0″ brass (1 pc)
- Ø 0.625″ x 1.875″ long brass (1 pc)
- Ø 1.5″ x 0.75″ long brass (1 pc)
- 1/4-20 x 1″ long set screw (1 pc)
I use the 1/4″ set screw just to simplify the project to allow for tapping the holes. If you tighten up that set screw with a bit of threadlocker it’ll hold more than enough.
Here are the drawings:
Dial Indicator Depth Attachment

A great attachment for making a simple dial indicator even more useful. This is a really good way of checking the depth of shallow steps or seeing how deep a damaged area on a part is.
This is the simpler of the two depth attachments. It’s a very basic project to get familiar with mills and lathes. You’ll get to do some threading on the lathe and learn how to make a clean undercut. You can also use it as an opportunity to grind some HSS cutting tools for threading and undercutting.
The milling portion is very simple. Even the perpendicularity of the hole to the bottom surface of the base isn’t critical enough to really affect the functionality of this tool.
Here’s the BOM:
- 1″ x 1″ x 2.125″ mild steel flat bar (1 pc)
- Ø 0.625″ x 0.625″ long brass bar stock (1 pc)
- Dial indicator (1 pc)
And here are the drawings:
Caliper Depth Attachment

A simple, handly little attachment for your calipers, this will fit Mitutoyo 6 and 8 inch models. It’ll also fit most other brands, but I ain’t making any promises.
This project gives you a bit of experience on both a mill and a lathe. Specific skills to hone are how to maintain perpendicularity, turning and threading small parts, and how to do a bolt circle (although it’s just cosmetic).
What’s nice about this project is that it doesn’t use a lot of material, and it’s 100% home made – no hardware required.
The project could also be modified to allow for some practice with heat treating and grinding if you want a hardened steel body. You could also learn to polish the brass. Do whatever makes you happy.
Here’s the bill of materials:
- 1.5″ x 0.5″ x 3.125″ mild steel flat bar (1 pc)
- Ø 5/8″ x .625″ long brass round bar (2 pcs)
- Calipers (1 pc)
If you want to harden it and grind it, replace the mild steel with 4140 or A2.
Here are the drawings:
Caliper Center Distance Attachment

This is a really simple little job, but it does require precision. What’s kind of cool about this is that for marking student projects, you can just have a plate drilled with holes in known locations, then compare what you get on the calipers.
Since there’s so little material needed, this is a nice and cheap project for an entire classroom to work on. The bottom of the slot is aligned with the center of the taper, so the idea is that you should be able to keep your calipers set as they are instead of needing to rezero for basic measurements.
This is a really handy attachment for measuring things like bolt circles. The only downside is that the top of the hole needs to be in good condition.
Overall, you get to try out working with a collet on the lathe (ideally) and being able to very accurately aligning and cutting a slot on a shaft. You’ll also get to try tapping some really small 4-40 holes.
Here’s the BOM:
- Ø 0.375″ x 1.875″ long TGP stainless round stock (2 pcs)
- 4-40 x 0.125″ long UNC half-dog point set screws (4 pcs)
And here’s the drawing:
Vee Blocks
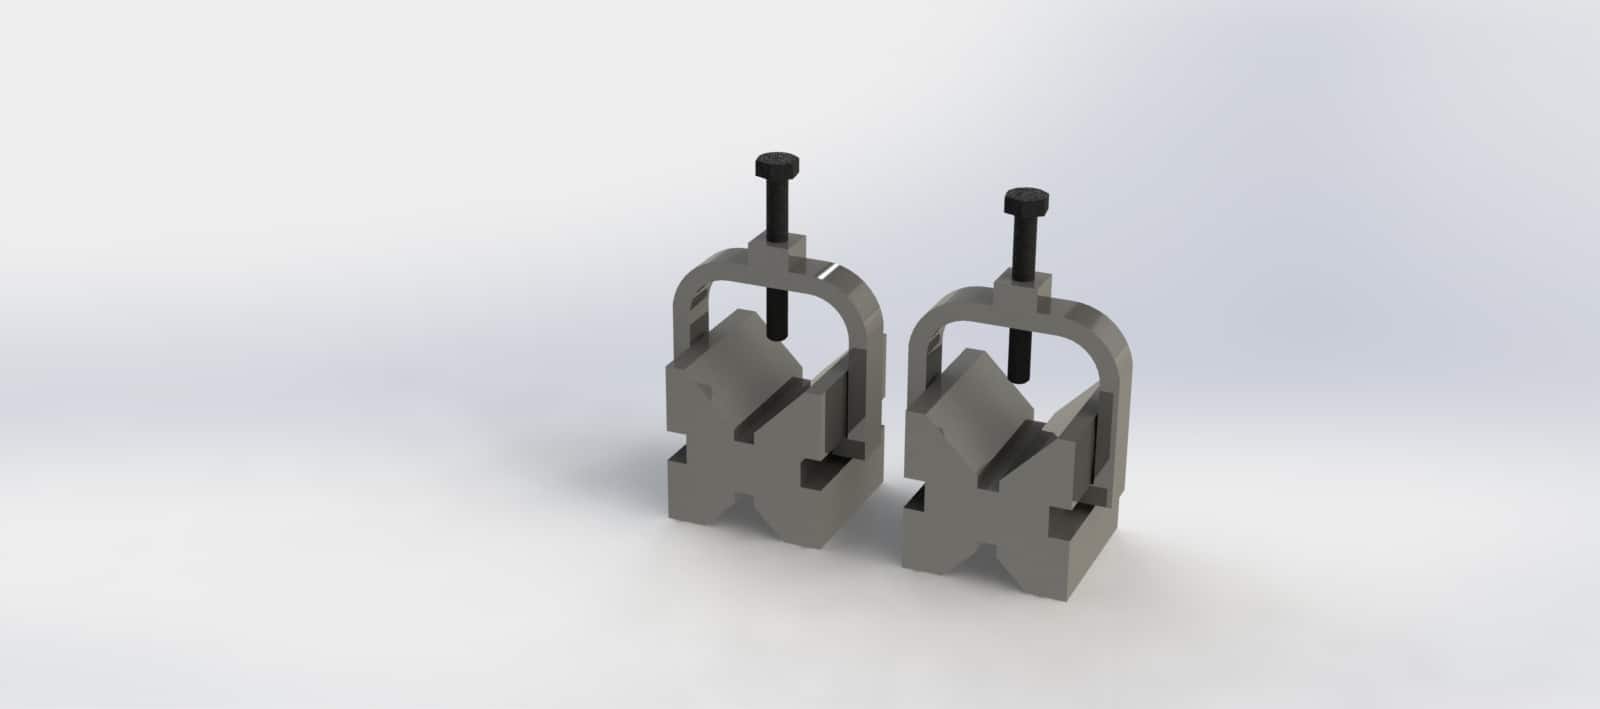
These are staple tools that you’ll seriously be using all the time.
This project will hone the skills of job planning, milling, heat treating, and grinding. If you choose to make the clamps using a band saw, there’s also the opportunity to practice layouts and some bench work.
If you’re teaching a course on machining, it might be cool to start on the clamps early on, and then later on make the vee blocks as a separate project. That way the students can be challenged at their skill level for both aspects of the project.
Here’s the BOM:
- 2″ x 2″ x 2″ 4140 steel (x2)
- 2.5″ x 2.5″ x 0.5″ mild steel (x2)
- 1/4-20 x 2″ long hex bolt (x2) – make sure to machine a half dog point on the tip so it doesn’t get stuck in the clamp
Here are the drawings:
Edge Clamps
This is a handy little set of clamps to have, especially when you’re working with longer pieces of flat bar or plates.
If you can keep the 1″ thickness accurate then you can also use 123 blocks to support your workpiece.
Here’s how they work: When you loosen them and push them against the workpiece, the jaw is moved off the countersunk hole centerline. When you tighten them, the flat head screw tries to force the jaw back into alignment to it can properly seat. The result is clamping force.
I’d recommend making them in sets of 6. This can be a great little CNC job, since there are a couple of them to run.
This project is good for people wanting to learn things like slotting on a mill, drilling, tapping and countersinking. The jaws and body are heat treated and ground.
This also exposes you to more creative ways of workholding; not everything needs to be done in a milling vise. You can flip them around to accommodate different operations and parts.
If you want to have some clearance under the part for drilling through, try putting the clamps on a 45-degree angle so only a small part of the base is supporting the part. For thicker workpieces, they can be used very similarly to a standard toe clamp.
For more bite, you can tilt the jaws at an angle in a vise and use an endmill to machine teeth on one side.
Ultimately, aside from being good practice for a few milling and grinding operations, having these clamps can be a good way of teaching problem solving when it comes to workholding.
Here’s the BOM:
- 1.25″ x 1.25″ x 4.125″ 4140 steel (x1 per clamp)
- 1.5″ x 1.5″ x 0.5″ 4140 steel (x1 per clamp)
- 1/2″ UNC x 1″ long flat head socket cap screw (x1 per clamp)
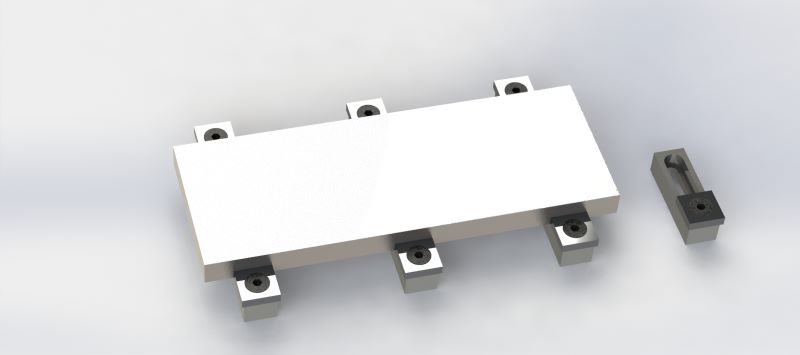
123 SuperBlocks

What kind of dark sorcery is this, you ask?
This isn’t the trick of CAD magic. You really can do this with 123 blocks.
By alternating a pattern of counterbored threaded holes, you can use a socket head cap screw with a large undercut to bolt these 123 blocks together. The best thing about it is that the bolt heads are competely inside the blocks, so there is zero interference as you’re making a creative setup.
Now, keep in mind that these bolts aren’t terribly strong. They won’t be competing with a hold-down clamp with a 1/2 stud and handling heavy machining. But they’re really handy when you want to use these block in a machine setup and don’t want them to move between cycles. Or if you need to stabilize a part in a way that gravity doesn’t agree with. Or if you need a creative inspection fixture. You get the idea.
Fair warning: these take a little longer to make than the more traditional (and less useful) 123 blocks. But it’s time well spent. They’ll be the envy of everyone in the shop and they’re just really cool. That’s why I call them 123 SuperBlocks.
Most people make the sets of 123 blocks match ground in pairs. I’d really recommend making at least a set of 4 of this kind. I’d even do 6 if possible. Since they’re so stackable, the more you have the better.
Personally I like to use A2 for jobs like this since it’s an air quench and very stable. I used O1 when I was in school and it worked OK but not great. It’s more prone to cracking, especially around sharp corners and threads, so a few guys had to start over. That said, it’ll work if that’s all you can afford.
Here’s the BOM:
- 1″ x 2″ x 3″ A2 steel, oversized 0.035″ (1 pc per block)
- 1/4-20 x 1/2″ socket head cap screw (2 pcs per block)
You might also want to make sure that you’re using an oversized tap (H11) instead of a more common H3 or H5, especially if you’re using O1. It tends to shrink and warp a little bit when heat treated, so you might not be able to use the threads otherwise.
Here are the drawings:
Tap Guide
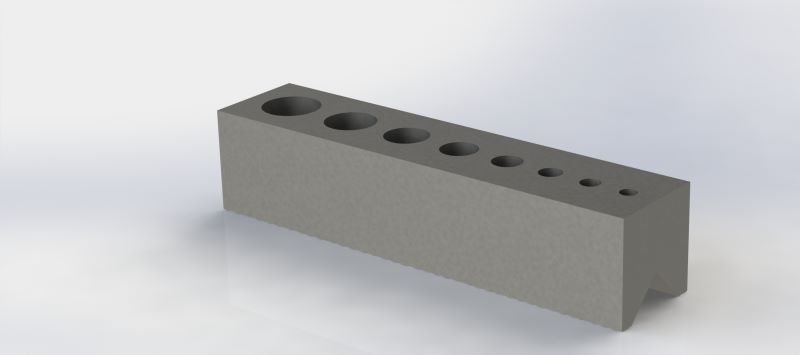
This is a dead easy project for something that’s actually pretty useful.
This is a tool that can help you keep your tap straight over a plate or a shaft. It has holes drilled to accommodate taps from #6 to 1/2″. The drawings specify mild steel, but you can use tool steel and heat treat it if you want it to last longer. If that’s the case, 4140 will work perfectly fine.
Even though this is a simple milling job, it’s a good opportunity to practice precision. The holes need to be aligned to the vee on the bottom. This can be an excellent exercise demonstrating how to precisely locate a vee using a pin and a depth mic to measure. You can use this to check both how it aligns to the outside edges as well as check the depth.
This is a good job for practicing how to align a vise. If you’re doing it on a CNC, there are also a bunch of drills to load up, so there’s some repetitive practice. The really nice thing about this is that it’s a handy tool and practical project that needs hardly any material.
Here’s the BOM:
- 1″ x 1″ x 4.125″ steel (1 pc)
Yep. Pretty basic.
Here’s the drawing:
Screw Jacks
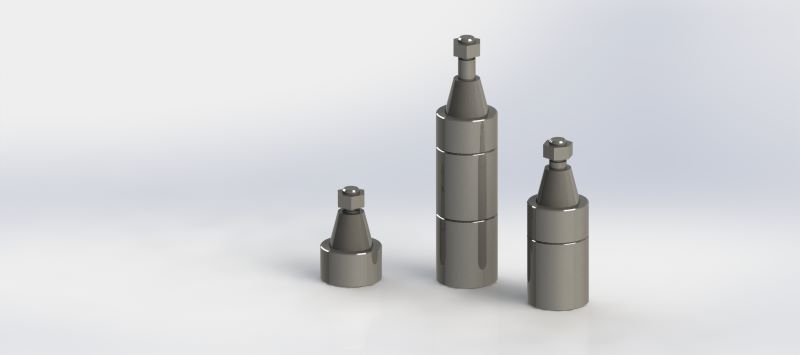
This one is another classic. I made mine in a CNC course in college. One thing I didn’t like about the set I made, though, is that they were really limited on the amount of travel you could get out of them.
That’s why for this set, I included the drawings for the riser blocks. These should give you a really good amount of reach to make these worth keeping in your toolbox.
If you program them on the CNC, then you can get a really nice set. Technically the bare minimum that would be useful is 3 units, but I’d recommend making more than that. It seems that I’m always using about 6 at a time.
If you make a set of 6, make two riser blocks for each screw jack. If you run these on a CNC lathe, you should be able to do each piece in one operation. The only exception is that you might want to flip the screw, so it has a nice, smooth finish everywhere.
This is a good project for learning CNC lathes, and it also gives a great opportunity to wrap your head around clearances and unilateral tolerances. You can feel what the difference is between a slip fit of 0.005″ and 0.015″.
Here’s the BOM to make a set of 6 (2 risers, 1 body, 1 screw per unit):
- Ø 1.0″ x 8″ long 4140 HTSR (x1)
- Ø 2.0″ x 40″ long 4140 HTSR (x1)
I put those in as bar lengths with a little extra to grip on to near the end of the run. This is because usually this is a CNC job, so cutting them all up into individual pieces will just end up wasting material and taking longer.
Vise Brake

This is a cool project.
Realistically, the most common approach to bending a piece of metal when you don’t have easy access to a proper brake is to shove it in a vise and wail on it with a hammer. This just makes that happen a little more professionally.
It’s got magnets that help it to just snap on to any steel vise. This is a tool that can give you accurate and clean bends in a very basic shop. The die is in three sections, so you can remove and adjust as needed if you’re working on smaller pieces.
This is one that most of your machinist buddies have probably never even seen, so it’s got a pretty high “nifty factor”.
The tool itself is pretty easy to make and mostly just teaches you not to put a workpiece in the milling vise the wrong way. What’s interesting about it though is that it’s a nice, very basic introduction to tool and die. This can be a way of learning some of the fundamental terminology and principles of sheet metal forming.
Since this probably isn’t something that’s going to see a ton of daily use, most guys just make it out of mild steel. If you want something that will last a really long time, make it out of 4140 instead and heat treat it.
Here’s the BOM:
- 2″ x 2″ x 6.125″ mild steel (2 pcs)
- 2″ x .25″ x 2.125″ mild steel (3 pcs)
- 8mm x 3mm neodymium magnets (8 pcs)
- 1/4-20 x 1″ long socket head cap screws (9 pcs)
And here are the drawings:
Well, there you have it. 13 machining projects for students and beginners.
There’s definitely nothing wrong with many of the more “trinket” style of projects that are common in many machining programs. You can get very focused in the operations to hone really specific skills.
The nice thing about making tools, though, is that there’s a lot of pride that goes into the workmanship, and the fact that you might very well still have them in your toolbox after ten or twenty years.
There are a whole slew of other tools that can be make by beginners. Here are a few other ideas:
- Parallels
- Dial indicator articulating arm
- C-clamps
- Drill point gage
- Edge finder
- Tap handle
- Magnetic chip shield
- Lathe dogs
- Center finder
- Live tailstock center
- Fly cutter
- CNC tool height presetter
- Bushing installation tool set
Are there any projects that you’d add to this list? Add them in the comments below.
If you enjoyed this article and think others could benefit from it too, please consider giving it a share on social media.