Annealing is a heat treating process that softens steel. This can make it easier to form or machine. It’s especially useful if you need to cut something that’s been welded up, like when you need to repair stripped threads on a shaft.
Metal is made up of a crystalline structure which directly relates to its mechanical properties. If you can modify the structure, you can adjust its hardness, malleability, toughness, tensile strength, and a whole slew of other things.
So how do you anneal steel?
To anneal steel, heat it up about 100 degrees F above its critical temperature, soak it at that temp for 1 hour per inch of thickness, and let it cool at a maximum rate of 70 F per hour.
Ok, that’s the short answer. Let’s go over how to do this in real life, depending on the tools you have access to, along with a few tips and tricks to help you get it (mostly) right the first time.
Table of Contents
How to Anneal Steel
In order to anneal steel, you’re going to need a way of heating up the metal until it’s bright red, hold it at that temperature for a while, and then very slowly allow it to cool.
There are two main approaches to this: using a torch, forging furnace, or other non-regulated source of heat, or using a programmable heat treating oven.
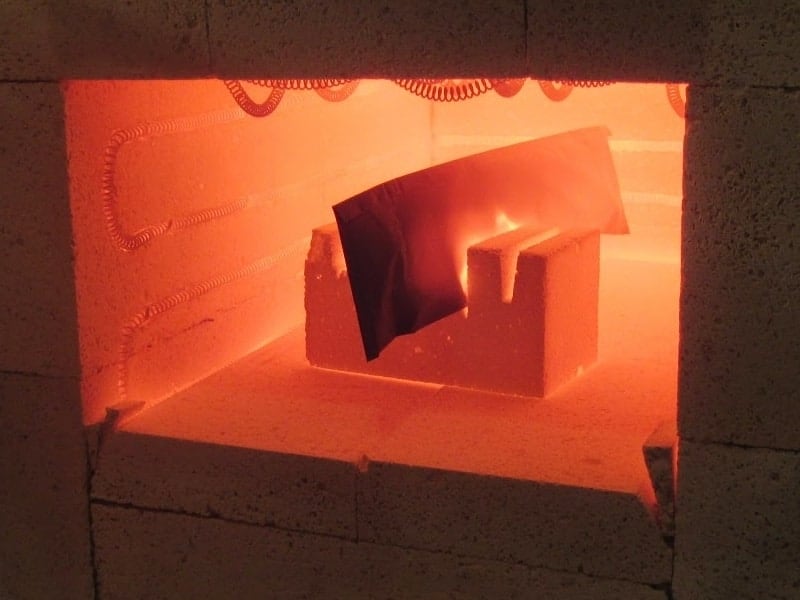
Using a Heat Treating Oven
Pros:
- Most controlled process, most consistent results
- Best way to fully anneal steel, right to the core
- If the oven is programmable, you can set it and walk away
- Really effective for parts with variable thicknesses
Cons:
- Can be unnecessarily time consuming for small parts, or if a full anneal isn’t important
- Heat treating ovens aren’t readily accessible to a lot of people
To execute this properly, it’s best to know the exact grade of steel you’re working with. If you bought the steel from a supplier, check with them for the recommended annealing temperature.
To be honest, it doesn’t really vary all that much – typically you’ll be annealing in the range of 1450-1650 F or so, but it’s still ideal to get an exact temperature to fully anneal the metal.
If you really have no clue what the steel is, I usually just start at 1500 F and try again at 1550 F if it doesn’t work as planned (repeat in increments of 50 as needed). Not the most effective method by a long shot, but it usually works. It’s ok to go a little too hot as long as you don’t melt the steel.
Once the oven is up to temperature, you’re going to need to let the metal “soak” – these means just holding it at that temperature. What this does is allow the metal to get hot enough inside, so it’ll be fully annealed the whole way through.
A rule of thumb for this is to soak the metal for one hour for every inch of thickness.
If you’re working with a really inconsistently shaped piece of steel that’s thicker in some sections than others, just go with the thickest section. So if the part is a shaft that’s 4″ diameter on the thick end and 2″ diameter on the small end, let it soak for 4 hours.
The nice thing about using heat treating ovens is that aside from having a really exact temperature, slow cooling is very easy. Just turn off the oven and keep the door closed. The fire bricks will hold the heat long enough to really control the cool down.
Alternatively, some ovens will let you program the cooldown rate. In that case, set it to 70 F per hour.
You can pull the part out before it’s fully cool – it’s fine if it’s still a couple hundred degrees. I find that usually if I program the oven in the afternoon and start the cycle, the part will be ready to pull out in the morning. Unless it’s a massive 8″ thick block, that is – it would take 8 hours just to soak it!
Once it’s cool enough to touch, test it with your preferred method for checking hardness to make sure that the process worked as planned.
Using a Torch
Pros:
- Really quick for smaller parts, like wires or clips
- A torch is generally more accessible to most people
- Once you have an eye for steel colors at high temperatures, you don’t necessarily need to know the exact grade of steel
Cons:
- Trickier to get a full anneal, achieving maximum malleability
- Takes more skill
- Time consuming for larger parts
- Very challenging for parts with variable thicknesses
This, in my opinion, is the runner-up in terms of annealing processes. If you can use an oven, you’ll pretty well always get better results with that instead of a torch.
That said, using a torch will work just fine most of the time. Here’s the process, with a few tips to make success more likely:
Especially if you’re working on larger pieces (like 1″ or thicker) try using a rosebud tip on an oxyfuel system. You’ll have an easier time heating up the metal consistently, without overheating certain sections.
Keep the flame away from any small, thin sections of the part. These will be really easy to get too hot and melt. If there are variable thicknesses, try putting the flame on the thicker part and allow the heat to work its way to the thinner sections.
Get the part a nice and orange-red. If there’s one thing to memorize from this, this is it: cherry red is for heat treating, orange-red is for annealing. If you’re not sure about the color of steel at various temperatures, I made this downloadable resource:
It also includes the colors at lower temperatures, which are usually used for tempering. Print it out and tape it on to your toolbox.
Keep in mind, though, that depending on your printer ink, monitor display, and the grade of steel, it may not match perfectly to the actual temp of the hot metal. It ain’t perfect, but it’s a decent guide to get started.
Another tip: Try to avoid annealing in direct sunlight. It’ll make it really hard to judge the color of the steel, so you could easily end up overcooking it. Do it inside a shop or garage if you can.
One more way of checking that the steel is hot enough is to check it with a magnet. Steel loses its magnetism once it’s at its “critical temperature”. So go smash open an old TV or microwave forone of those big, chunky magnets in the name of good workmanship!
Once it loses its magnetism, let it continue to brighten up just a little bit, since annealing needs to be done about 100 F above the critical temperature.
Heat up the metal nice and steadily, and give it enough time to get hot in the center, too. Once it’s that beautiful orange-red, now comes the tricky part: slowing the cool.
Slow Cooling Options
Air cooling is too fast for annealing, so you’ll need to help the part to retain its heat once the torch is off. Here are a few ways of doing this:
Dry Sand or Vermiculite
This can be an effective way of keeping the part warmer for longer.
Vermiculite is something that’s added to soil to make plants happy, and it’s also a great insulator. Sand is great for retaining heat, too. One thing worth noting is that it needs to be pretty pure stuff, you don’t want any roots or mud in the mix if at all possible. Construction or play sand work well.
Do not use sand or vermiculite that is moist.
Moisture + red hot glowing metal = undesireable results. Basically, it just won’t retain the heat, the part will cool down too quickly, and you’ll have to redo the annealing. There are also stories floating around the internet about things exploding when there’s moisture. I think that this is more of a problem with larger stones/bricks, which can crack and explode when the moisture turns to steam, but it’s best to err on the side of caution and avoid explosions when possible.
It’s best to just totally bury the metal to really insulate it. If you’re doing something the size of a knife, then let it sit in a 5 gallon pail of the stuff. It’s cheap and reusable so don’t be stingy.
If you’re looking for vermiculite, you can pick it up on Amazon fairly cheap, or you can check around at local home/garden stores.
Insulating Blanket
This is convenient since there’s less of a potential for making a mess, and you can roll it up and put it back on the shelf very easily.
There are a few different kinds that work perfectly fine. You can get blankets for chimneys and wood stoves that are really effective. Another good option is to pick up a roll of ceramic fiber insulation, which will usually be pretty easy on the budget and will last you a while.
Trick for Cooling Small Parts
Some parts are small enough to be next to impossible to slow cool unless they’re in an oven. Here’s one way around that:
Heat up a larger block of metal or two along with the small part that you’re annealing. When you put it in the insulation, put the larger hot block(s) in contact with the small piece. That will keep it hot long enough to get a nice, slow cool for annealing. It’s a solid way of making steel take many hours to cool.
The ideal cooldown rate for annealing steel is about 70 F per hour, down to about 500 F. In other words, a piece of steel that’s cooling from 1500 F to 500 F should ideally take about 14 hours. Actual ideal times will vary by grade of steel, but that’s a decent rule of thumb. Lots of guys like to let it take 24 hours, but personally I find that to be a bit unnecessary unless it’s a special grade of steel.
What Steels Can Be Annealed
Generally speaking, it’s tool steels that are most commonly annealed. You’ll need to soften the steel to be able to cut or bend it.
Alloy steels can also be worthwhile to anneal, but this is where you should get to know your grades. Depending on the alloy, the annealing temperatures might vary a lot more than you’re expecting.
Anything that can be hardened can be annealed. You won’t see much of a change in something that’s really low carbon, like 1018 mild steel. In something like a 4140, though, the results can be very noticeable.
How to Tell What Material You’re Working With
This is the tricky part. Ideally, you bought the metal from a supplier, and they can tell you the exact grade and heat treating temperatures.
In real life, though, this isn’t always the case.
This is where torch annealing really shines. Just heat it up orange-red, slow cool it, and don’t worry about it. Otherwise, it really helps to know what kinds of steel are common for different applications.
Google is your friend, too. Just try searching something like “what grade of steel is ____ made from” and see what comes up.
Here are a few guidelines for common mystery metals:
| Shafts | For light-duty shafts, usually a mild steel is used, which won’t need annealing. Heavier-duty shafts are often made from 4140 steel. Anneal at 1600 F. |
| Springs | Leaf springs and coil springs from vehicles are usually made from a 5160 or equivalent steel. Not always, though. For 5160, anneal it at 1450 F. |
| Rebar | Your guess is as good as mine. Rebar is made from whatever scrap metal is available, and it’s not very consistent, either. You could have one end of the bar that’s dead soft mild steel, and the other end of the same bar that’s fully hard. Just torch anneal it by eye and hope for the best. If you want to know more about rebar, check out this article about what it’s made from. |
| Rail Spike/Track | Again, not always the most consistent in terms of composition. Usually, tracks will tend to be more heat treatable than spikes. Fairly often it will be something similar to an A36, which can be annealed at around 1550-1600 F. Check out this article for spikes and this article for tracks to learn more about common compositions. |
| Structural Steel (I Beams, C Channel, Etc) | The most common structural steel is A36, although there are variations. This is more consistently used for the heavy-duty stuff, like industrial construction. For the small stuff, it could still be A36, or it could just as likely be something else. Anneal at 1550-1600 F. |
Related Questions
What’s the difference between annealing and tempering?
Annealing fully softens the metal, making it malleable, whereas tempering simply reduces the brittleness of the metal. Annealing is done at high temperatures, usually at about 1500 F for steels. Tempering is done at low temperatures, typically up to about 500 F. Typically tempering is done after a hardening process to relieve internal stresses and prevent future catastrophic failure.
What’s the difference between annealing and normalizing?
Annealing is a very slow, controlled cooling process, whereas normalizing is cooled much faster in open air. Normalizing is primarily done to reduce internal stress and make the grain structure more uniform. Normalized steel is usually partially hard, instead of fully soft like annealed steel.
Normalizing is also significantly cheaper, since the parts are cooled in open air instead of sitting inside an expensive furnace, slowing down production.
Can I anneal other metals, like copper?
Copper can be annealed, although the process is slightly different. The temperature for annealing copper is typically 700 F, or a glowing red color. The main difference is that annealing copper doesn’t require slow cooling; actually, a rapid water quench will likely give the best results.
Other metals can be annealed based on grade and type. Brass, silver, and certain grades of aluminum can be softened by this process.