I’ve done professional etching, so when I heard about salt water etching using a few things that you have laying around your room, I was a bit skeptical that you could actually get decent results. I was wrong.
So I just tried it out for myself, and I was pleasantly surprised at how well it turned out. I don’t claim to be an expert on this (by any means) but I did a bunch of research before doing it, and I tried a couple of different techniques based on things I read.
Consider this to be the beginner of all beginner’s guide on how to do salt water etching on metal. I’ll go over what you need, what the steps are, and a few tips I came up with after a bit of practice.
By the way, I called this “salt water etching in stainless steel” because that’s what I’ve been doing it on. In reality, you can do this on just about any metal.
Table of Contents
Before You Start…
Make sure that the metal that you’re wanting to etch doesn’t have some kind of plating or coating. Sometimes metal is covered in a varnish or nickel coating, and this will really mess with your etching.
I haven’t been able to get good results with coated metals. I’m not saying it’s impossible, it’s just not likely that you’ll be able to get what you want very easily.
Also…. *insert default safety speech here*.
What You’ll Need
If you strip etching down to the bare elements, you only need 3 things:
- Electricity
- Metal to etch
- A corrosive liquid
Now if you want to etch a pattern, some letters, a logo, etc, then you’ll also need something to mask the areas that you don’t want etch. Otherwise, it’ll just be a bunch of splotchiness and general unattractiveness. Think of it kind of like using a stencil with spray paint. Sorta.
Anyway, for this project, here’s what I used:
- A 9v battery and snap connector
- A Q-tip
- Nail polish remover
- Salt
- Water
- Electrical tape
- A craft knife
- Something metal to etch
- Some very small container for the salt water
You can definitely change the items on that list, this is just the stuff that I had on hand. For the record, the nail polish remover is my wife’s.
As I go through the steps, I’ll explain how we use each of these things, along with what you might be able to replace them with.
This’ll go a lot smoother if you have everything organized and within arm’s reach. Keep a bit of paper towel or similar around in case you spill something.
Clean the Metal
The metal that you want to etch needs to be totally clean and oil-free. Otherwise, your etch will be splotchy and inconsistent. Even oil from your fingers needs to be cleaned off.
Oil will just make a barrier between the metal and the salt water.
For this step, I used nail polish remover and paper towel to wipe off the knife. I gave it a couple of extra wipes with the dry paper towel just to make sure there wasn’t any kind of oily residue on the metal.
You can kinda use whatever for this step. Degreaser, isopropyl alcohol, etc. Anything that will remove oil from that surface so that you can get clean, direct contact.
Mix the Solution
There is no magic ratio here. Take the salt. Mix it with water.
I tried a few different ratios, and I really didn’t see much of a difference. But if you really need someone to tell you exactly what to do, then take a tablespoon of salt and mix it in a shot glass of water.
Just mix it around until it’s somewhat dissolvedish.
Apply the Masking
If you’re wanting a super professional logo/lettering/graphic, then you definitely are going to want to invest in a vinyl cutter like this one. You will not get better results than that.
But if you’re just wanting to mess around like I did, all you need is some tape. I used electrical tape for this, and it worked great. I’m sure that if you used something else, like masking tape, the results would be basically the same.
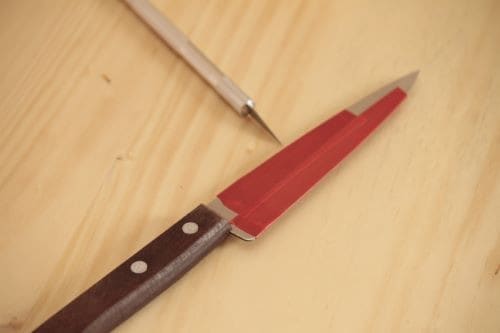
Make sure that you cover an area that’s fairly large compared to the size of the etch you’re wanting to do. If the salt water drips at all, it’ll start etching in an undesirable location pretty well instantly.
Cut the Pattern
Now use that craft knife to cut out the pattern you’re wanting to etch into your metal. It might help to use a fine-tip Sharpie to trace out the shape first.
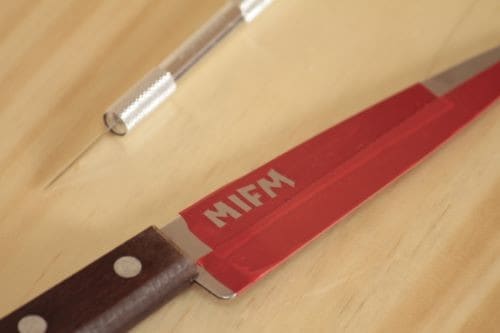
It’s super important that your knife is razor sharp. Absolutely every flaw in the tape will show up in the etch. This means that if your edges are jagged, your lines in the etch will be jagged too. Take your time, and if you’re not 100% happy with it, you’re better off just pulling off the tape and trying again.
PREPARE THE DEVICE!!!
Ok, all capitals might have been a little excessive, but I always feel my inner mad scientist trying to break out when I mess around with stuff like this.
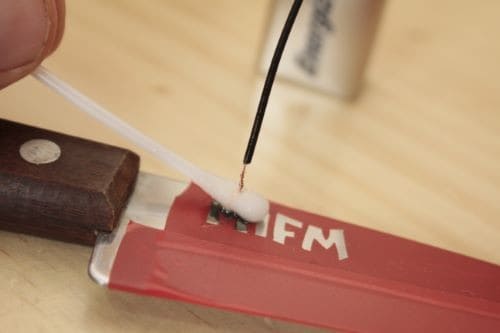
So now we’re going to tire the black wire around the Q tip like in the picture below. We’ll hold the red wire against the metal, sort of nearish to where we want to etch. Dip the Q tip in the salt water and get ready for the most excitement you’ve ever experienced.
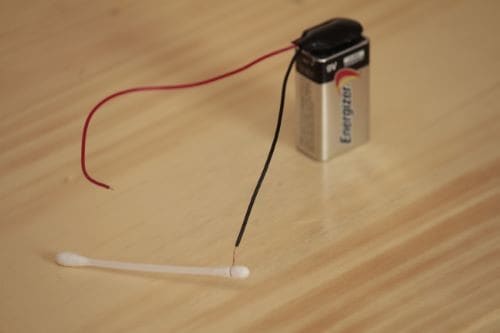
You don’t have to use a 9v battery, you could try something with more power. Some people have used things like car battery chargers, drill chargers, and all manner of miscellaneous junk. At the end of this post, I have a recommendation for a great little power source that I use for all kinds of little projects for this.
Etch
This is where the magic happens. Dab the Cottony Wand of Oceanic Electricity (aka saltwater Q tip) against the metal within the confines of the stencil you cut out. Don’t rub it around, since this might lift the tape and wreck the etch lines. Just be super gently at this step, it’s all about a soft touch and patience.
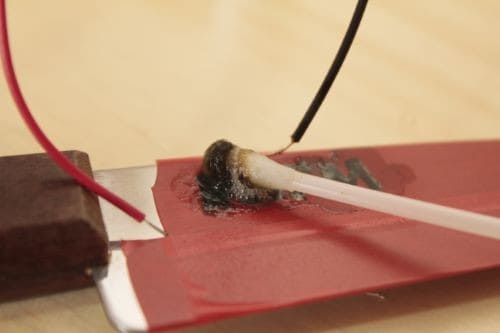
You’ll know it’s working when you see fizzing, like when you add baking soda to vinegar. It’s not a lot, but it’s there, it’s audible, and you can smell it. You’ll also see a blackish sludge being produced. That’s the little particles of metal being disintegrated.
The longer you etch, the deeper it goes. Within seconds of touching the metal, that etch will be visible. For really light etches, though, I have a hard time with keeping that matte look consistent; they always come out slightly blotchy. It’s much easier with deeper etches.
As a point of reference, the etch that I did took about 5 minutes of “burn”. The more surface area that you have to etch, the longer it will take. Super light etches could rub or wear off, deep etches will last (almost) forever. Personally, I prefer the deep etches.
You can gently wipe off the black crud to take a look at how it’s going. Just be super careful not to lift the masking. Once the masking lifts, you’re done.
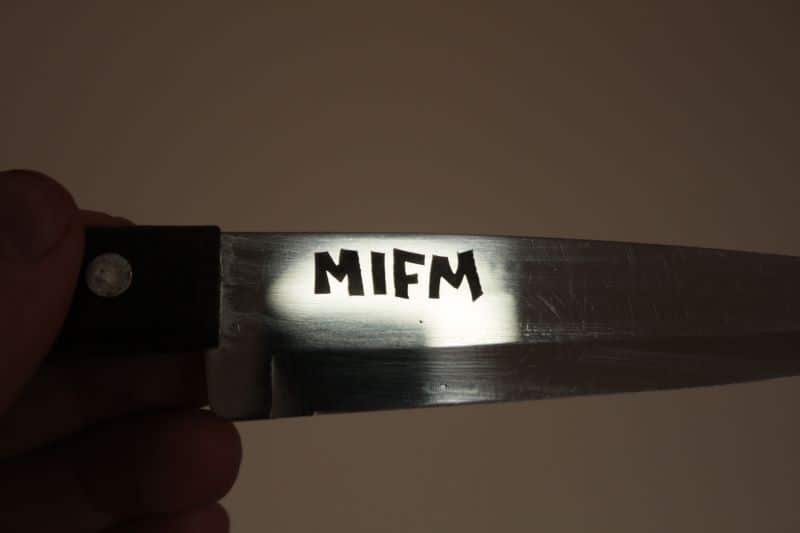
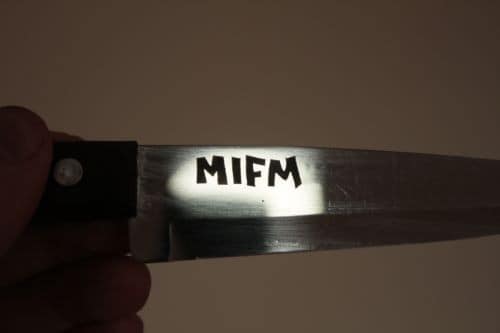
When you’re happy (as far as you can tell) with how it looks, give the shiny metal object a wipe, peel off the masking, and admire your work of art.
My $0.02 on Salt Water Etching
This was a fun little Sunday afternoon project. If I feel like tinkering around, I’ll probably try it again for kicks.
Overall, for things like just writing a name on a steel water bottle, this isn’t the most straightforward solution. An engraving pen is cheap, waaaay faster and is my go-to for labeling metal or plastic.
It’s definitely viable though, if you’re wanting to do some Etsy type of craft-for-sale with a logo. You’d need to make a little investment, though, in a vinyl sticker cutter. I’d also highly recommend getting a proper power source unless your logo is absolutely tiny. It’ll help you get that etching done quickly and more consistently. A 9v battery can only do so much.
Really, though, this is absolutely worth trying. You can put a logo on knives, water bottles, etch your name on the inside of a ring, on your tools, you name it. It’s a fun little activity.