Today, there are some really amazing tools that the pros use for bending pipes and tubes. Computer controlled tube benders can pump out complicated exhaust pipes faster than you can say “I would like an efficient and economical way of forming pipe for my car exhaust, if you don’t mind”.
Sometimes, though, that’s just not possible. Tube and pipe bending can be done a number of ways with a variety of tools. In this article, I’ll go over a few different options based on what your application is, as well as how you can pull this off properly. Just look for whatever best matches what you’re trying to do. Everything is in the table of contents so feel free to scan through it to get right to the info you’re looking for.
Table of Contents
Introductory Information
Ok, to start off let’s go over a bit of important information. Namely, what’s the challenge with bending tubes and pipes.
There are actually a few challenges that you need to watch out for. One of these is kinking. If you just grab a piece of tube and bend it over, it’ll pinch and kink where the bend is. This makes the tube weak and nothing will be able to flow through it. Nobody likes it when their pipes get kinky.
The second is cracking or fatiguing the metal. This is generally a challenge for materials like copper and aluminum. If the metal isn’t annealed, you can expect problems. Steel tends to be pretty malleable, so you might only need to apply heat if it’s too heavy to bend yourself.
For most of these, I’d recommend trying it out of a practice piece first. This’ll let you get an idea of how it’s going to look. You can also check for cracking and decide if you need to anneal it.
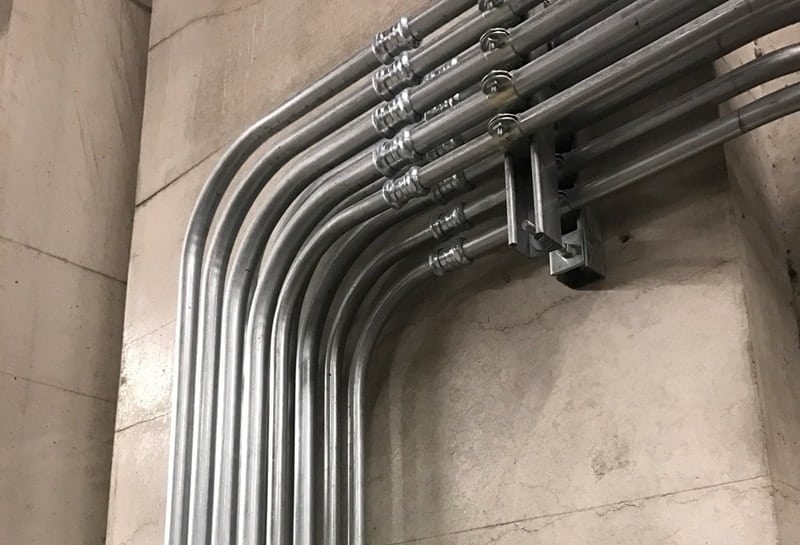
How to Bend EMT Conduit
Galvanized steel or aluminum EMT conduit is actually an awesome material to use for structures. Conduit is the stuff that you normally use to run wires in an industrial building. It’s super durable and pretty strong stuff.
A lot of guys I know have used it to build things like really sturdy tents and sheds. Some people will use PVC pipe, but the conduit is stronger and (in my opinion) looks nicer. It’s also really cheap! 1/2″ x 10′ will usually run you a little over $3 per length. You can do some awesome work with this stuff.
Here’s a little list of ideas for what you can do with it:
- Bike/ATV trailers
- Go-cart frames (I’d recommend welded connections, but make sure you clean off the zinc first)
- Tents and sheds
- Greenhouses
- Shelving
- Racks (like for bikes and tools in your garage)
- Curtain rods
- Awnings
- A trellis (trellises? or trelli?)
- Geodesic domes
- Computer desk frames
It’s also really easy to make some professional-looking bends with EMT conduit. A common tool for industrial electricians is a conduit bender. The best thing about them is that they’re actually really cheap for the more economical ones. Of course you can also rent one, but for this cheap you might as well just buy one. The best bang for your buck is this one on Amazon. You’ll have to click the link to check the current pricing.
The nice thing about the conduit bender is that you’ll have great, consistent bends throughout your project. They bend at a radius that keeps the conduit strong and unkinked, so the end result looks great.
One thing to watch out for is that you’re getting a conduit bender that matches the diameter of the conduit. I like 1/2″ because it’s cheap and easy to work with, but you can also get it in larger sizes, like over 2″ diameter. I’m not sure how hard those are to bend but hand though; I’ve never personally worked with anything that large.
The advantage to getting a conduit bender is that they have a bunch of really useful marks on them so you’ll know what angle you’re bending to. They’re super handy and you’ll have your project whipped up in no time.
If you need tighter bends or don’t want to bend the metal yourself, you can just buy a bunch of zinc die-cast connectors and fasten everything together.
How to Bend Exhaust Pipes
It’s really worthwhile to use a tube bender for this. It just makes your bends super easy and clean. A proper tube bender will have a few sizes of dies to match the diameter of your exhaust and will make sure that you’re not kinking it.
Ask your buddies if anyone has access to one. Lots of metal shops have one tucked away in a corner.
To be honest, your best bet might just be to take it to an exhaust shop. Those guys will have machines worth $7k and up, and they’ll be able to do it faster and cheaper than you can. They’ll turn out beautiful, too.
An alternative is to buy a bunch of preformed pieces, then cut them up and weld them together. I’d probably go this route before trying to bend them myself.
Here’s an example of what you can buy for a reasonable price:
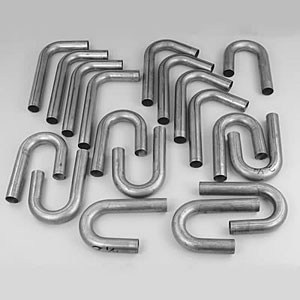
If you’re a decent welder, you can end up with a great exhaust system. Plus, it’s a fun job. Just be aware that you might have problems with inspections down the road if you DIY it. It depends on where you are, but most places won’t like the fact that you’re not certified to do this. Something to do with a risk of leaks that will let out toxic gas before it runs through the catalytic converter, damaging the environment and lungs of small children.
Alternatively, you can use the sand method. It’ll take some patience and muscle for something as big as an exhaust pipe, but it’s doable. I get into the sand method in detail below, so just scroll on down if you want to give it a go.
How to Bend Copper Tubing
There are generally two types of copper tubing that you’ll run into: The straight lengths of pipe and the flexible coils.
The flexible coil is highly bendable. That’s what it’s made to do. The walls are thin and you can even bend it (to an extent) just with your hands as long as it’s a wide bend. For sharper stuff, though, you’ll probably kink it.
If you want something that can bend smaller pipe (like 1/4, 3/16, and 3/8 outside diameter) you can get a little handheld tubing bender that makes this really easy. There’s one for sale on Amazon that’s great. It’s from Tekton; it’s really easy to use and works perfectly for soft stuff like copper, aluminum and thin-walled steel. It’s also really economical, you can check the current price here.
The main challenge with the flexible coil is getting it straight. If you’re going to have it even slightly visible, I’d highly recommend that you get a tubing straightener. This is one that mounts in a vise (you could also screw it into a piece of wood to keep it stable) – It’s a good bang for your buck since it actually works. There are cheaper ones out there, but since this is adjustable, you’ll get the pipe significantly straighter. All you have to do is shove in the pipe, turn the knob to adjust it, and yank the copper tubing through. Works like a charm.
Don’t want to buy tools?
Here’s a weird hack that actually works once you get the hang of it: Go outside. Lay out a long piece of 2×10 or plywood, then string out a length of tubing that’s about the same length. Swing the tubing gently like you’re chopping wood with an ax in slow motion. Not like Thor doing the jumping ground slam; you’ll look silly. Hit it against the wood. If you do it gently, it’ll straighten out.
Don’t judge me. I’ve done it and it works. I saw a guy mention it in a forum and decided to give it a try for kicks. Just don’t whack it too hard, or the tube will flatten toward the end.
For the straight lengths of tube, you’re really better off just using elbows and joints. That stuff doesn’t like to be bent very much, it’s very easy to crack it, split it, or kink it.
If you really need to bend it, try heating it up. A plumber’s torch will work if you’re patient. An acetylene torch will work much faster. You can also try annealing it if you don’t want to work with it while it’s hot.
Alternatively, you can try the sand or frozen soap water method that I get into later.
How to Bend Brake and Fuel Lines
To professionally bend brake and fuel lines, use a brake line forming tool.
You can definitely bend them by hand with practice and patience, but the brake line benders are super easy to use (especially in cramped quarters), they do nice and tight bends, and your work will just look a lot nicer.
Honestly though I’ve had some pretty bad luck with a lot of the cheap tools. There are so many garbage brake line benders that don’t even work, or they’ll break as soon as you try your first bend.
If you’re going to buy one, it is entirely worth spending a little more on something with a recognizable brand name. I love the one from Eastwood. It’s still reasonably priced, it works extremely well (just grab and twist) and there will be minimal crimping on the line. Your lines will really look nice and tidy with this tool. Check here for current pricing.
If you’ve got a lot of patience, and you’re wanting perfect results, you could also try hand bending with the frozen soap water method. If you practice a bit and take your time, you can have perfect hand bends with absolutely no visible marks. This is great for tedious things like classic car restoration, where you want everything to be pristine. I’ll go over this method more below.
How to Roll Pipe and Tubing
This is a great way of bending pipe and tube, but the tools are a bit more expensive.
You can get large radius, pretty consistent bends with this method. It works by pushing the pipe or tube between three rollers, which pinch and push the metal as it rolls through. A roller can work well for any type of tubing, whether it’s square or round. All you need is a die that matches the shape. You can also form much heavier duty material, since you can gradually pass material through the rollers several times over. In other words, this is a solid option for more structural pieces.
The down side to this is that it can be slow. There are automated ones that can be pretty efficient, but it’s more common to see the farmyard variation – something like a hydraulic jack or a big handwheel will move the rollers. There’s a hand crank that will drive one of the wheels and pull the pipe through the rollers. It’s not uncommon to have to roll it through about 60 times to get a nice bend. Your arms will be in good shape if you have a few pipes to bend.
You’ll also get a little bit of a kink on either end of the bend. Nothing major, just something that’s slightly noticeable.
How to Bend Pipe and Tubing With Sand
I haven’t been able to prove this, but I heard that Ferrari formerly (and maybe presently) use(d) this method to hand-form their exhaust pipes. This method (along with the next one with frozen soap water) takes a bit of work, but the results are really impressive.
One thing that people don’t like about using forming tools with pipe and tubing is that it will deform the metal at the bend. Basically, if you insert a ball that perfectly fits in the inside of a pipe and try to roll it through, it’ll get stuck where the bend starts. This is because there will be a slight indent where the dies squashed the metal slightly.
More often than not, this is totally not an issue. But for the guys that are perfectionists, the sand method is really interesting.
Here’s how it works:
Make a form that has the radius you want. This can be done a few different ways. You can use wood to make the shape of the radius that you want. Allow for overbend since the metal will want to spring back a bit. Figure out a way of clamping at one end without squashing it. You can line the wood with some sheet metal so you don’t burn it too much when you heat up the pipe.
Plug one end of the pipe/tube. Fill it with very dry sand. Then fill the tube with the sand, tamping it down gently. Do not pack it tightly, just firmly. Fill it all the way up. Then plug the other end.
There’s generally two common ways of plugging the ends: Either crimp them shut and cut them off later or stuff them with a rag (better for smaller stuff).
Now heat up the metal with a torch. Take your time. It’ll take a little longer since you’re also heating up the sand, but the sand will also help to retain some of the heat while you’re bending. Get it red hot.
Safety note: If your sand is damp, you could run the chance of having the pipe explode because the steam has nowhere to go. To thoroughly dry out the sand before using it, cook it thoroughly. I like to bake it for an hour in an oven just before using it.
Now put the pipe in the form you built. Use welding gloves to handle the pipe. You heated it up, therefore it will be hot. Clamp one end and pull the other along that radius until you get the bend you want. Be patient, take your time. Don’t expect your first one to come out perfect. Let it cool down a bit before you take it out.
There are a few challenging aspects to this method. For example, getting the right feel for how tight to pack the sand. Too tight and it’ll take a lot more muscle to bend. It can also stretch the metal too much on one side of the bend and be really hard to get out. Too little and the pipe will collapse in on itself.
It can also take a little bit of practice to get the right size of radius and to mark out where the bends should start and stop. This is especially true if you’re trying to do something really precise. If you don’t very carefully cradle the clamped end, you’ll probably want to cut off a few inches because the clamp will really deform the pipe.
Really though this is a cool way of bending pipe. It can be very frustrating at first to get the results you want, but with practice you can do great bends. A lot of professionals use this method to this day to do premium work. This is also a really old-school technique. Apparently they’ve been doing this for hundreds of years. Don’t ask me who “they” are.
This works great for larger diameter stuff, like (in my experience) 3/4″ and up. The tricky part can be getting the sand out. For smaller tubing, check out the frozen soap water below.
How to Bend Pipe and Tubing With Frozen Soap Water
This works really great for small tubes of malleable materials. For example, brass, aluminum, and steel.
So here’s the cool thing with the frozen soap water method: it makes a hard gel while it’s frozen (crushed popsicle-like consistency), and then it melts and washes out. The soapy water also self-lubricates, so it’s very smooth on the inside for the bending. No scratches.
Here’s how to do it:
- Mix soap and water, 1:1 ratio. I have no technical information about the exact ideal ratio, but that’s what I did and it worked.
- Cap one end of the tubing. The easiest way to do this is to just crimp it shut and cut it off later.
- Pour in the mixture.
- Cap the other end.
- Toss it in the freezer overnight.
- Build a form. Use wood, pegs, random round things, whatever matches the shape you want. For small stuff with a tight bend, using the edge of a 2×4.
- Remove frozen tube from freezer.
- Now bend it over your form.
- Congratulations. You now have a bent tube.
This method produces really nice bends with no kinking. I heard that this is more or less the method they use to make brass instruments like trumpets, tubas and whatnot. I don’t know if it’s actually soap water or some other kind of gel mixture that doesn’t need to be cold, but the principle is the same.
Let the pipe warm up and take off the caps. Drain out the soapy water and rinse the tube thoroughly.
There you have it, you are now armed with the required information to master the art of tube bendery! Ultimately, you need to make the call of whether it’s worth it to bend the pipe/tube or to just use off-the-shelf connections. Connections are often simpler and faster, whereas bending is often stronger, less likely to leak, and (if you did a good job) prettier.
Questions/comments? Post them below. You could also be really cool and share this on social media. Everyone cool is doing it.
Related Questions
What’s the difference between tube and pipe?
The rule of thumb to remember the difference between tube and pipe is that pipe is measured by its inside diameter, whereas tube is generally measured by its outside diameter.
Pipe inside diameters aren’t exact; they’re the nominal dimension. This means that they’ll be a little larger than the rating. Imagine it this way: the size of the pipe is equal to the diameter of ball that could safely pass through the system without getting stuck.
How can I bend square steel tubing?
This is harder in terms of how much force you need, but generally you can do it with the same general approach as round tubing. If you’re forming it with a tool, the dies will be flat instead of rounded.
Another option is to cut a V on the inside of the bend, then bend it, then weld the inside. This is a solid connection and (if you’re a good welder) can look pretty.
What is take up?
Take up is a conduit bending term that refers to the amount of conduit that the bend will take up. Essentially, it’s how much of an offset you need from the start of a bend to where it straightens out.
Usually, a reference will be marked on the bender handle. When you’re marking your lines, use this number to get the distances correct.