The G83 milling canned cycle is one of the most common drilling cycles in use. In this quick article, I’m going to show you what it does, how to program it, and when to use it.
Table of Contents
What G83 Does
G83 is a deep hole drilling cycle. The main reason to use G83 is for good chip evacuation.
At each hole, the drill will lift up and out of the hole at a set interval, pulling the chips away from the cut zone. This also allows coolant to get down to the tool tip if you’re not using thru-spindle coolant.
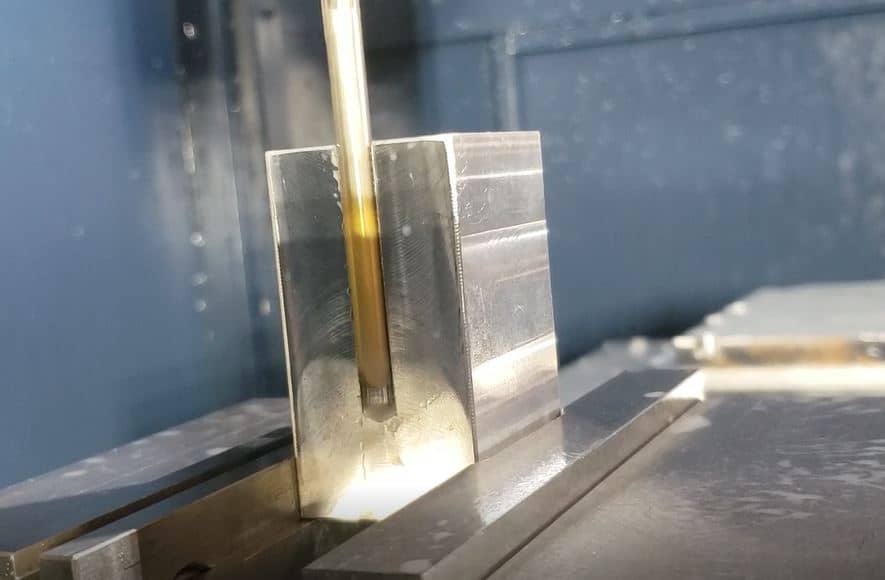
Here’s a video showing this exact motion:
(crank up the volume to get the most out of the video)
G83 Commands
Here are the commands that you need to know to properly use a G83 canned cycle:
| X | The X axis position of the hole |
| Y | The Y axis position of the hole |
| Z | The final Z depth of the hole. This is in reference to the program origin when using absolute programming |
| R | The rapid point. The tool will rapid down to this Z height, and then feed to the final Z hole depth. In G98 mode, the tool will retract to the initial Z position before drilling. In G99 mode, the tool will retract to this R plane. |
| Q | Peck depth. This is how far the tool will go down before pulling up out of the hole, rapiding back down, and continuing on with drilling. |
| P | Totally optional, and I rarely use it. This will make the machine dwell at the end of the hole. P1000 is equal to a dwell of 1 second. |
| F | Feedrate. Assuming you’re milling in G95, it’s input in inches per minute. |
G83 Program Example
Let’s make a program to cut the part below:
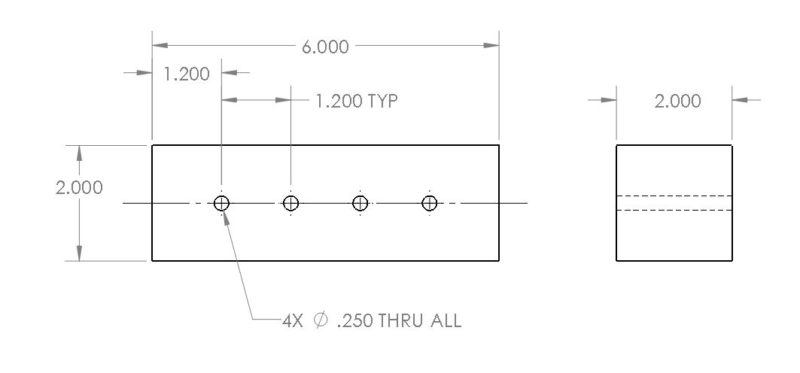
The material is cold-rolled steel (CRS), and we’ll use a 1/4″ carbide drill in our vertical mill to punch in these holes. The drill doesn’t have thru-coolant. Keep in mind that carbide drills generally don’t need to be spotted if they’re entering a clean, flat surface. Since 2″ is pretty deep for a 1/4″ drill, G83 is the ideal canned cycle for this application.
Our origin will be at the top left corner of the workpiece and the Z will be at the top of the stock.
Here’s a program that we could use:
O1000
(BLOCK_DRILLING)
G00 G17 G40 G90 G20 (this is the safety line)
N10 ( OPERATION: DRILLING )
T01 M06 (0.250 CARBIDE DRILL) (this line calls the tool change)
G00 G54 X1.2 Y-1. S6112 M03 (calls the G54 work offset and moves the tool above the first hole, also turns on spindle at 6112 RPM)
G43 Z.125 H01 (picks up the tool height offset and brings the drill down to 0.125 above the workpiece)
M08 (coolant on)
G83 Z-2.1518 R0.1 F18.3 Q.125 (drills the first hole, peck depth is 0.125, retract plane is 0.1 inches above workpiece, we’re cutting at 18.3 inches per minute, and going down a bit past the bottom of the stock to ensure that the drill breaks through)
X2.4 (drills the second hole)
X3.6 (third hole)
X4.8 (fourth)
G80 (cancels the canned cycle so that no more holes are drilled when you call out a new XY position)
G00 G91 G28 Z0.0 (home the Z axis to get the tool out of the way)
G00 G91 G28 Y0.0 (home the Y axis to bring the table forward so you can inspect your handiwork)
G90 (returns the machine to absolute positioning mode)
M30 (end program)
How to Choose a Peck Depth
This is usually the biggest debate around G83. What Q value should we use?
Here are some of the factors that come into play when selecting a Q value:
- Drill diameter
- Drill coating
- Drill geometry
- Material machinability
- Hole depth
- Feeds and speeds
- Coolant delivery
All other things being equal, the drill diameter is generally what determines your Q value. At any depth greater than 4xD, you generally don’t want to exceed a peck of 0.5xD.
That means that for a 1/2″ diameter hole that’s 3″ deep, a peck depth of 0.25″ is about the most you’d probably want. To play it safe, I’d start with a Q value of 0.2.
However, if you’re machining something gummy or otherwise challenging, you might be best off decreasing that value to something like .15″ or even 0.1″.
Things to Watch For
If you’re making a very deep hole, it’s important to make sure that your flutes are long enough that the chips can escape. If the chips aren’t sliding easily up the flutes and out of the hole, you’ll have to either reduce your peck depth substantially or look into other solutions like thru-spindle coolant.
Keep in mind that the shallower your peck depth, the longer it will take to drill the hole. This means that for low-volume production, you might not mind a few extra seconds per hole for the sake of playing it safe, but if you’re making thousands of holes….
Heat buildup is another reason that you might want to reduce your Q value. If you have a massive, kinda sharp HSS jobber drill that doesn’t have the web thinned out, you might be getting a really hot tool tip. At that point, though, you might want to rethink your reasons for your tool selection. Big HSS jobber drills are pretty old school in CNCland.
Extra Features of G83
Some machines have additional parameters that you can set to gain greater efficiency out of a G83 cycle.
For example, Haas machines can use an I,J and K command to specify peck depth instead of the Q value. Check your programming manual to see if it’s available on your machine. Here’s what these commands mean:
| I | Depth of initial peck |
| J | Amount to reduce peck each retract |
| K | Minimum peck depth |
This is handy because it can save you a few unnecessary pecks as the tool gets down into the workpiece.
For example, you shouldn’t have any major problems with drilling a 1/2″ hole in mild steel to a depth of 0.5″ without pecking. With a Q of 0.25″, though, the machine would peck once as it drills to that depth.
With the IJK values, you can use an I value of .5 so that the drill won’t waste time pecking when it doesn’t need to. You could use a J value of .05″ and a K value of .25″ so that it will gradually reduce the depths of each peck. This overall will save you a little time on each hole.
Again, nothing that you’ll notice in small quantities, but every millisecond adds up when you’re drilling thousands of holes.
There are several canned cycles that are important to learn if you want to get the most out of your CNC machine. If you’re still learning the ropes, I’d highly recommend checking out my Beginner’s Guide to Canned Cycles for Milling.